


Sign up for ZitaPlus, where knowledge and personalized support come together for your success.
Open Real Account Open Demo Account
Unlike traditional support and resistance levels, order blocks aim to reveal where big players have placed their orders, and how price is likely to react when it returns to those areas.
If you've ever noticed price pausing, reversing, or consolidating around certain zones, there's a good chance you're looking at an order block. These areas represent the footprint of significant buying or selling, often left behind by banks or large institutions.
Traders use order blocks to spot high-probability trade setups, define precise entry and exit points, and improve overall risk management. But like any tool, they’re only effective when used with context and discipline.
In this guide, we’ll break down what order blocks really are, how to identify them on a chart, how to trade them with confidence, and how to protect yourself from common traps. Let’s start with the basics.
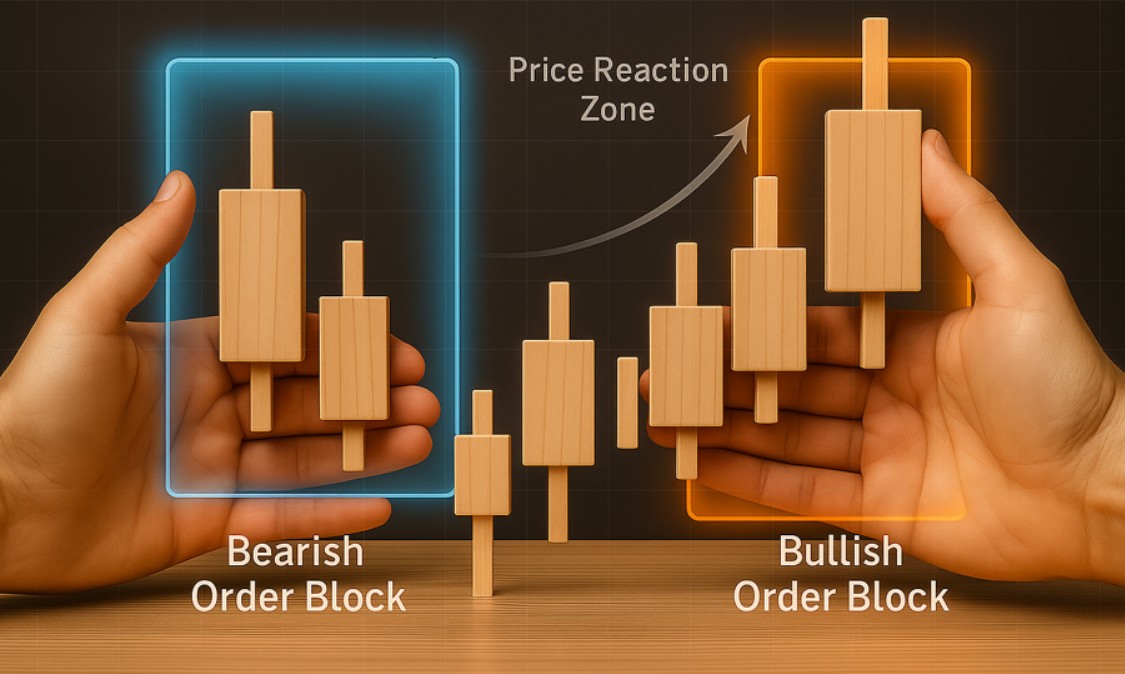
An order block is a price zone where large institutional orders were previously placed, causing a strong move in the market. These areas often act as key levels of interest where price may react again, either by reversing or continuing the trend.
In simple terms, they show where major buying or selling happened, and where it may happen again. They’re often found just before a sharp price move, and are used by traders to predict entries, exits, and turning points.
There are two main types of order blocks:
Order blocks are sometimes confused with supply and demand zones. While they can overlap, order blocks focus more specifically on the exact candle or zone where institutional orders were likely executed, often leaving clues behind like imbalance or unfilled orders.
Spotting order blocks takes practice, but once you understand what to look for, they become much easier to recognize. These zones often mark the last area of buying or selling before a significant price move.
Here’s how to identify them:
Once you know what to look for, order blocks start to appear more consistently, especially in trending markets.
Once you've learned to spot an order block, the next step is turning it into a solid trade setup. The goal is simple: enter near where smart money previously stepped in and manage risk around that zone.
After price makes a strong move away, mark the last opposing candle; that’s your order block. Then wait. When price revisits that zone, you're looking for signs that the level is being respected.
You have two common options:
Put your stop-loss slightly beyond the zone. This gives the trade room to breathe while protecting you if the level fails.
Target recent swing highs or lows, or use a fixed risk-to-reward ratio (like 1:2 or 1:3). Trail stops if price continues in your favor.
Increase your setup’s strength by combining order blocks with other tools, like support/resistance, trendlines, or Fibonacci levels.
Trading order blocks is all about timing and discipline. You’re aiming to align with the same levels that institutions care about, and that requires patience, not just pattern-spotting.
Let’s walk through a simple example to see how a bullish order block can be used in a real trading scenario.
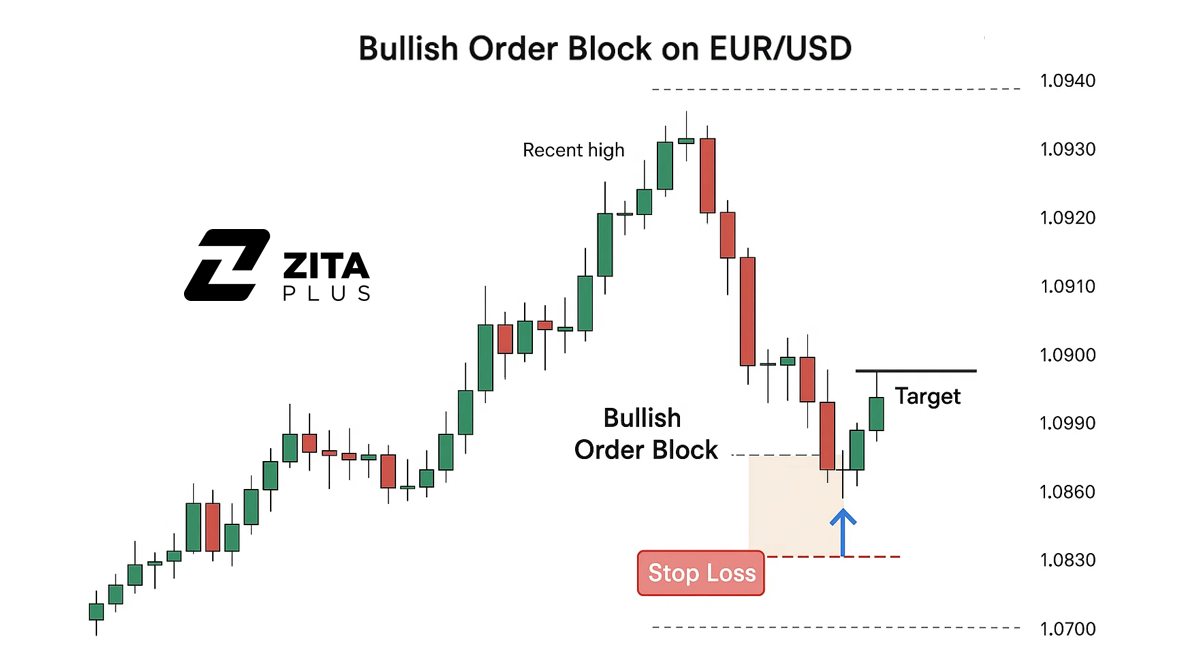
Example 1: Bullish Order Block on EUR/USD (H4 Timeframe)
Let’s say the price is in an uptrend on EUR/USD. On the 4-hour chart, price retraces and forms a small consolidation. Then, from that area, it pushes up strongly with a large bullish candle, breaking a recent high.
Before that breakout, the last bearish candle (just before the strong push) becomes your bullish order block.
When price comes back down to retest this zone, you watch for a bullish rejection (e.g., a pin bar or engulfing candle) and enter long. Stop-loss is placed just below the order block, and your target is set at the next swing high.
It’s easy to get excited when you spot a clean order block, but without proper risk management, even the best-looking setup can backfire fast.
Start with your stop-loss. Give the trade some breathing room by placing your stop just outside the block. Too tight, and you’ll get stopped out by normal price noise. Too wide, and you’re risking more than necessary.
Don’t trade every order block you see. The chart will always offer opportunities, but not all of them are worth taking. Stick to blocks that line up with the trend or show up at key levels, that’s where price is more likely to react.
Keep your risk per trade under control. Even the strongest setups fail sometimes. A small, consistent risk (like 1–2% of your account) keeps you in the game long enough to benefit from the ones that work.
And most importantly, know that not every block will hold. Some will break, and that’s fine. The goal isn’t to win every trade. It’s to stay consistent, protect your capital, and let the edge play out over time.
Even though order blocks can offer precise entry points, many traders run into trouble by treating them like magic zones. Here are some of the most common mistakes and how to avoid them:
Marking every zone as an order block
Just because the price moved strongly doesn’t mean a real order block was involved. Focus on zones with clear structure and context; not every impulse move is worth trading.
Ignoring the bigger picture
Placing trades based on isolated blocks without considering market direction or structure is a fast way to get caught on the wrong side. Order blocks work best when they align with the trend or key turning points.
Jumping in too early
Entering as soon as the price touches the block, without any reaction or confirmation, often leads to unnecessary losses. Waiting for a sign of rejection or a shift in momentum adds protection to your setup.
Placing stops too tight
Many traders squeeze their stop-loss right at the edge of the block and get stopped out by normal volatility. Give your trade some space, but within your defined risk tolerance.
Expecting every block to hold
Order blocks are high-probability zones, not guarantees. Sometimes price will blow right through. The key is managing those losses and staying consistent with your plan.
Avoiding these habits doesn’t require a new strategy. Just more patience, better structure, and a willingness to wait for the right conditions.
Order blocks offer insight into where real interest exists in the market. When marked correctly and traded with patience, they can help you enter with precision and control your risk more effectively.
Like any tool, they work best as part of a structured approach. Use them with context, pair them with price action, and always protect your capital.
If you’re just getting started, focus on learning to spot clean setups. Practice on higher timeframes and review past trades. Over time, order blocks can become one of the most reliable elements in your strategy.
Would like to learn how to look financial markets from a different angle? Then keep reading and invest yourself with ZitaPlus.


